Lumina Dimoo
An omni discrete diffusion model for multimodal generation and understanding. Built with a unified discrete diffusion architecture, Lumina Dimoo handles inputs and outputs across modalities with strong sampling efficiency and balanced quality.
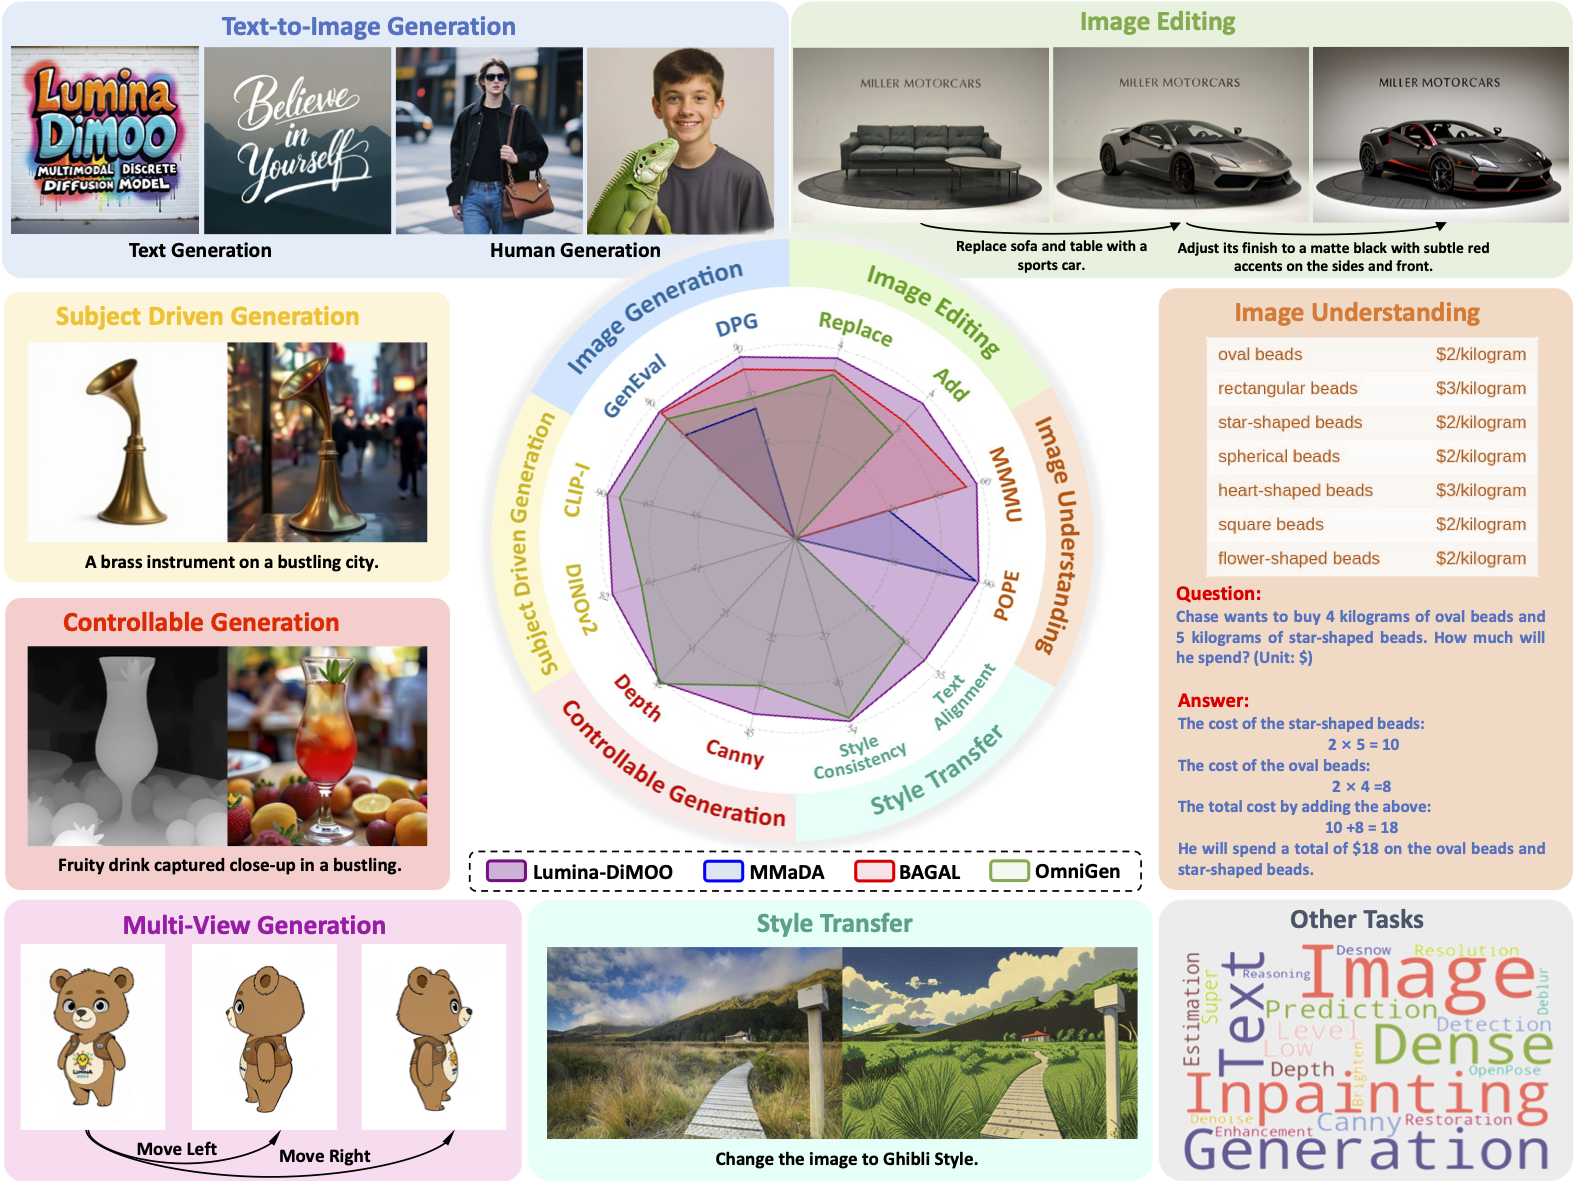
Primary focus: text-to-image, image-to-image, and image understanding with practical performance on common tasks and benchmarks.
What is Lumina Dimoo?
Lumina Dimoo is a foundational model designed to work across multiple modalities using a fully discrete diffusion process. This means the same core approach is applied for producing images from text, editing images with image inputs, and answering questions about images. A discrete formulation keeps the model’s interface consistent across tasks and allows straightforward sampling schedules.
The model supports three practical families of tasks: text-to-image generation for prompts with simple or compound structure; image-to-image tasks such as editing, inpainting, and subject-driven changes; and image understanding tasks where the input is an image and the output is text. A single model supports these patterns, focusing on predictable behavior and clear controls.
Sampling is designed to be efficient. Compared with typical autoregressive or hybrid approaches, Lumina Dimoo aims to shorten the number of steps while keeping fidelity and instruction following. A dedicated cache helps reuse intermediate states, reducing repeated computation and improving throughput.
Across public benchmarks, the model reaches strong scores for composition, counting, color consistency, and spatial relations, showing that a discrete diffusion backbone can provide competitive quality for general tasks in a straightforward way.
Key Ideas
Unified discrete diffusion
Inputs and outputs are tokenized and processed by a fully discrete diffusion pipeline. Using the same abstraction across tasks lowers the mental overhead for operators and makes it easier to bring new tasks into the same framework.
Multimodal coverage
Text-to-image for broad prompts and detailed scenes, image-to-image for editing and restoration, and image understanding for answers and descriptions. The scope is practical and covers frequent needs in content creation and analysis.
Sampling efficiency
A shorter schedule with a caching method to remove repeated work. This helps when running many prompts, batched edits, or interactive sessions where quick feedback is important.
Consistent results
Focus on instruction following, layout, counting, and attribute control. The model aims for steady behavior across prompt styles and input quality.
Practical capabilities
Text-to-image
- Composed scenes with multiple subjects
- Color and attribute control
- Layout hints and relative placement
- High-resolution output
Image-to-image
- Editing and inpainting
- Subject-driven generation
- Background updates
- Tone and color adjustments
Image understanding
- Targeted Q&A
- Captions and summaries
- Attribute listing
- Structure and layout descriptions
Efficiency and scale
- Shorter sampling schedules
- Cache for repeated states
- Batch-friendly setup
- Predictable memory use
How it fits day-to-day work
Text-to-image serves quick concept drafts, options for layouts, and reference scenes. It supports high-resolution output with prompts that can spell out subjects, color, placement, and style. For longer prompts, the model aims to keep the main subject and relations intact.
Image-to-image supports common edits: change or extend backgrounds, fix color, swap subjects, or apply inpainting to fill missing parts. Subject-driven generation keeps the main subject recognizable after changes. For restoration, gentle updates help align tone and texture without strong artifacts.
Image understanding helps organize and describe images. It can answer targeted questions, summarize content, and list attributes. This is useful for search, tagging, and quality checks.
Pros and Cons
Pros
- High-quality alpha mattes
- Handles imperfect segmentation masks
- Stable object tracking performance
- Refinement without retraining
- Interactive and flexible workflow
Cons
- Relies on initial segmentation mask
- Memory-intensive for recurrent refinement
- Performance varies with object complexity
Getting started
You can set up Lumina Dimoo locally with common tools. A typical flow is to prepare a Python environment, install dependencies, obtain model files, and run a small script for text-to-image or image editing. For a step-by-step guide, see the Installation page in the navigation.
- Create and activate a virtual environment
- Install required packages
- Download checkpoints
- Run a quick script to verify output
Installation
This guide shows a simple way to run Lumina Dimoo locally for text-to-image and image-to-image tasks. Adjust steps to match your OS and hardware.
1. Prepare environment
- Install Python 3.10 or later
- Install Git
- Have a GPU-ready setup if you plan to generate at higher resolution
2. Create a virtual environment
python3 -m venv .venv source .venv/bin/activate # Windows: .venv\\Scripts\\activate3. Install dependencies
Install core libraries used for inference. Replace versions as needed for your system.
pip install torch torchvision --extra-index-url https://download.pytorch.org/whl/cu121 pip install transformers diffusers accelerate safetensors pillow einops numpy4. Obtain model files
Download the public checkpoints for Lumina Dimoo from your preferred source and place them in a directory, for example: models/lumina-dimoo/
- Create a folder: models/lumina-dimoo
- Put the weights and config files inside that folder
5. Run a quick test
The following is a placeholder Python script outline to confirm your environment works. Adapt it to your actual checkpoint paths.
import torch from PIL import Image # Placeholder: load your pipeline here # pipe = YourLuminaDimooPipeline.from_pretrained("./models/lumina-dimoo").to("cuda") prompt = "a calm lake with pine trees and soft sunlight" # image = pipe(prompt, num_inference_steps=25).images[0] # image.save("output.png") print("Done")6. Tips
- Lower num_inference_steps for faster drafts; raise it for quality
- Use a small negative prompt to avoid unwanted elements
- For image-to-image, start with modest changes and iterate
Note: This page is a simple starter. Refer to official repositories and model cards for exact installation commands and options.